The esp32 attachinterrupt function is a cornerstone of creating responsive, efficient, and powerful applications on the ESP32 microcontroller, allowing developers to move beyond simple polling and embrace event-driven programming. In a typical program, the microcontroller executes code sequentially within the loop() function. To check for an external event, like a button press, the code must constantly read the state of a digital pin—a process known as polling. While simple, polling is inefficient. The CPU spends most of its time checking for a change that rarely occurs, wasting processing cycles that could be used for other tasks. Interrupts fundamentally change this paradigm. Instead of the CPU constantly asking, "Has anything happened yet?", an interrupt allows an external event to tell the CPU, "Hey, something important just happened!" This frees the CPU to perform other operations, only pausing momentarily to handle the event when it occurs. The esp32 attachinterrupt command is the primary tool in the Arduino framework for harnessing this capability.
Daftar Isi
What Are Interrupts and Why Are They Essential?
- Arduino Beginner Projects: Your Gateway to Electronics and Programming
- Arduino Based Projects for Beginners
- Mastering attachInterrupt on the ATtiny85: A Comprehensive Guide
- A Comprehensive Guide to Using attachInterrupt on the ESP8266
- Mastering Arduino attachInterrupt: A Comprehensive Guide to Real-Time Control
An interrupt, in the context of a microcontroller, is a signal that temporarily halts the main program flow to execute a special piece of code in response to a hardware or software event. Think of it like a doorbell ringing while you’re focused on reading a book. You don’t stop every few seconds to check if someone is at the door (polling). Instead, you continue reading until the sound of the bell (the interrupt signal) forces you to pause, answer the door (execute the special code), and then resume reading where you left off.
The benefits of using interrupts, particularly through the esp32 attachinterrupt function, are significant:
- Improved Responsiveness: Interrupts allow the system to react to events almost instantaneously. This is critical for applications that require precise timing or immediate feedback, such as detecting motor encoder pulses, monitoring emergency stop buttons, or capturing data from a fast sensor.
- CPU Efficiency: By eliminating the need for constant polling, the CPU is free to execute other complex tasks, like managing a web server, updating a display, or performing calculations. This leads to better overall performance and lower power consumption, as the CPU can even enter a low-power sleep mode and be awakened by an interrupt.
- Simplified Code Logic: Event-driven programming can often lead to cleaner and more manageable code. Instead of cluttering the main
loop()with numerousifstatements to check different inputs, you can create dedicated, isolated functions (Interrupt Service Routines) to handle each specific event. - Precise Event Detection: Interrupts are excellent at catching very brief events that might be missed by a polling loop. If a signal pulse is shorter than the time it takes for the
loop()to execute one cycle, polling will likely miss it entirely. An interrupt, however, will catch it reliably.

The esp32 attachinterrupt Function Explained
To implement interrupts on the ESP32 using the Arduino core, you use the esp32 attachinterrupt function. Its syntax is straightforward and powerful, providing the necessary configuration in a single line of code.
Syntax:
attachInterrupt(digitalPinToInterrupt(pin), ISR, mode);
Let’s break down each parameter in detail.
1. digitalPinToInterrupt(pin)
This is the first and perhaps most crucial parameter. You do not pass the raw GPIO pin number directly to the function. Instead, you must use the esp32 digitalpintointerrupt(pin) macro. This macro translates the GPIO pin number you are using (e.g., 23) into the specific internal interrupt number that the ESP32’s hardware understands.
pin: The GPIO pin number you want to monitor. For example,23,18,5.- Why is this necessary? The mapping between a physical GPIO pin and its internal interrupt controller number is not always one-to-one and can vary between microcontrollers. The
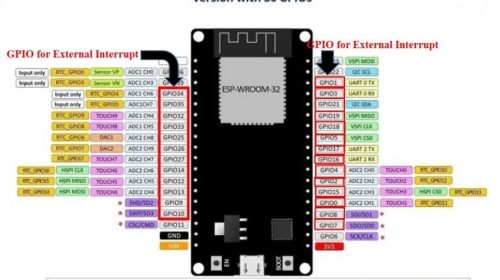
esp32 digitalpintointerruptmacro abstracts this complexity away, ensuring your code is more portable and readable. On the ESP32, virtually all GPIO pins can be used for interrupts, which is a significant advantage over older microcontrollers like the Arduino Uno.
2. ISR (Interrupt Service Routine)
This parameter is the name of the function that will be executed when the interrupt is triggered. This function is called an Interrupt Service Routine (ISR). When writing an ISR, you must follow a strict set of rules because it operates in a special context:
- Keep it Short and Fast: An ISR should execute as quickly as possible. While the ISR is running, all other interrupts are typically disabled, meaning the microcontroller is temporarily "deaf" to other events. Long ISRs can cause other important interrupts to be missed.
- No
delay(): You must never usedelay()ordelayMicroseconds()inside an ISR. These functions rely on timers that are often managed by interrupts themselves, which can lead to a system deadlock or crash. - Avoid Serial Communication: Functions like
Serial.print()should generally be avoided inside an ISR. They are slow and can rely on buffer mechanisms that may not work correctly within an interrupt context. - Modify Global Variables Carefully: If your ISR needs to share data with the main program, the shared variable must be declared with the
volatilekeyword. This keyword tells the compiler that the value of this variable can change at any time, preventing the compiler from making optimizations that could cause your code to misbehave.
3. mode
This parameter defines what kind of signal change on the pin will trigger the interrupt. The ESP32 supports several modes:
RISING: The interrupt is triggered when the pin’s voltage goes from LOW to HIGH.FALLING: The interrupt is triggered when the pin’s voltage goes from HIGH to LOW. This is the most common mode for button presses with a pull-up resistor.CHANGE: The interrupt is triggered whenever the pin’s state changes, either from LOW to HIGH or HIGH to LOW.ONLOW: The interrupt is triggered as long as the pin is held LOW (level-triggered).ONHIGH: The interrupt is triggered as long as the pin is held HIGH (level-triggered).
The choice of mode is critical and depends entirely on the nature of the input signal you are trying to detect.
Practical Implementation: A Step-by-Step Example
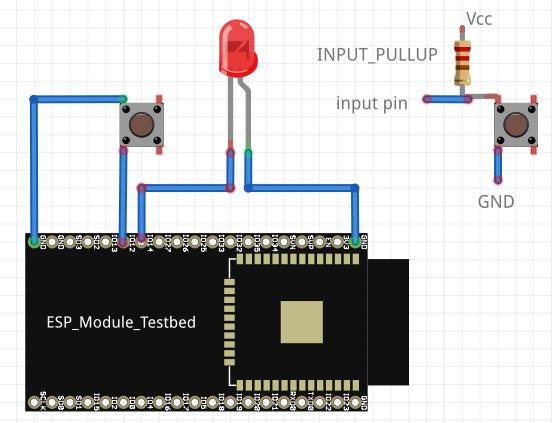
Let’s build a classic example: toggling an LED with a button press using an interrupt. This demonstrates the power of the esp32 attachinterrupt function.
Hardware Setup:
- ESP32 Development Board
- An LED
- A 220Ω resistor (for the LED)
- A push button
- A 10kΩ resistor (for pull-up, though we can use the ESP32’s internal pull-up)
- Breadboard and jumper wires
Wiring:
- Connect the LED’s anode (longer leg) to GPIO 2.
- Connect the LED’s cathode (shorter leg) to the 220Ω resistor, and the other end of the resistor to GND.
- Connect one leg of the push button to GPIO 4.
- Connect the other leg of the push button to GND.
Code Breakdown:
// Define the pins used
const int buttonPin = 4;
const int ledPin = 2;

// Volatile variable to store the LED state
// 'volatile' is crucial for variables shared between an ISR and the main loop
volatile bool ledState = LOW;
volatile bool interruptFlag = false;

// Interrupt Service Routine (ISR)
// This function must be as fast as possible.
// IRAM_ATTR attribute places the ISR in internal RAM for faster execution.
void IRAM_ATTR handleInterrupt()
  interruptFlag = true;


void setup()
  Serial.begin(115200);

  // Configure the pins
  pinMode(ledPin, OUTPUT);
  // Set the button pin as an input with an internal pull-up resistor.
  // The pin will be HIGH by default and go LOW when the button is pressed.
  pinMode(buttonPin, INPUT_PULLUP);

  // Attach the interrupt to the button pin
  // We use the esp32 digitalpintointerrupt macro to map the pin.
  // The ISR 'handleInterrupt' will be called on a FALLING edge (button press).
  attachInterrupt(digitalPinToInterrupt(buttonPin), handleInterrupt, FALLING);

  Serial.println("ESP32 ready. Press the button.");


void loop()
  // The main loop can be busy doing other things.
  // For this example, it just checks the flag set by the ISR.

  if (interruptFlag)
    // An interrupt has occurred
    Serial.println("Interrupt triggered!");

    // Toggle the LED state
    ledState = !ledState;
    digitalWrite(ledPin, ledState);

    // Reset the flag
    interruptFlag = false;


  // Other code can run here without being blocked by waiting for a button press.
  // For example:
  // delay(1000);
  // Serial.println("Main loop is running...");
In this example, the esp32 attachinterrupt function is configured in setup() to watch buttonPin. When you press the button, the pin’s voltage falls from HIGH to LOW, triggering the FALLING mode interrupt. The handleInterrupt() ISR is immediately executed. Instead of doing heavy work, the ISR simply sets a volatile boolean flag, interruptFlag, to true. The main loop() periodically checks this flag. When it sees the flag is true, it knows an interrupt occurred, toggles the LED, prints a message, and resets the flag. This "flagging" pattern is a best practice for using the esp32 attachinterrupt system, as it keeps the ISR minimal and fast while letting the main loop handle the heavier processing.
Advanced Concepts and Best Practices
While the basic use of esp32 attachinterrupt is straightforward, real-world applications often require a deeper understanding.
Debouncing
Mechanical buttons don’t produce a clean signal when pressed. The metal contacts "bounce" for a few milliseconds, creating a series of rapid HIGH-LOW transitions. This can cause a single button press to trigger your interrupt multiple times.
To solve this, you need to implement debouncing. A common software technique is to record the time of the last interrupt using millis() and ignore any subsequent interrupts that occur too quickly.
Here’s how you could modify the ISR to handle debouncing:
volatile unsigned long lastInterruptTime = 0;
const unsigned long debounceDelay = 50; // 50 milliseconds

void IRAM_ATTR handleInterrupt()
  unsigned long currentTime = millis();
  if (currentTime - lastInterruptTime > debounceDelay)
    interruptFlag = true;
    lastInterruptTime = currentTime;
This simple check ensures that the interruptFlag is only set if at least 50 milliseconds have passed since the last valid trigger, effectively filtering out the noise from button bounce. Correctly handling debouncing is vital for a reliable esp32 attachinterrupt implementation with mechanical switches.
Detaching Interrupts
Sometimes, you may need to temporarily or permanently disable an interrupt on a pin. For this, you use the detachInterrupt() function.
Syntax:
detachInterrupt(digitalPinToInterrupt(pin));
This is useful in scenarios where you want to ignore input during a critical operation or when reconfiguring a pin for a different purpose. The powerful esp32 attachinterrupt is complemented by this ability to disable it when needed.
The Role of esp32 digitalpintointerrupt
It’s worth re-emphasizing the importance of the esp32 digitalpintointerrupt macro. It is not a function that performs an action but a pre-processor macro that acts as a translator. It ensures that the pin number you provide is correctly mapped to the interrupt resource required by the underlying hardware. Forgetting to use this macro and passing a raw pin number is a common mistake for beginners and will result in the esp32 attachinterrupt call failing. Always use esp32 digitalpintointerrupt to maintain code correctness and portability.
Conclusion
The esp32 attachinterrupt function is an indispensable tool for any ESP32 developer. It enables the creation of highly efficient, event-driven applications that can respond to external events with minimal latency. By offloading the task of monitoring inputs from the main processing loop, it frees up the powerful dual-core CPU of the ESP32 to handle more demanding tasks like networking, data processing, and user interface management. By understanding its syntax, adhering to the best practices for writing lean ISRs, and implementing crucial techniques like debouncing, you can leverage the full potential of esp32 attachinterrupt to build robust and sophisticated embedded systems.
