Utilizing attachinterrupt esp8266 is a powerful technique for creating responsive, efficient, and real-time applications with this popular Wi-Fi-enabled microcontroller. Unlike the traditional method of polling, where you constantly check the state of a pin in your main loop(), interrupts allow your ESP8266 to react instantly to external events, such as a button press, a sensor trigger, or a signal from another device. This frees up the processor to handle other critical tasks, like managing a web server or processing data, without missing a single important input. Understanding how to correctly implement interrupts is a fundamental step in moving from basic Arduino-style programming to more advanced and robust embedded systems design. This guide will provide a deep dive into the theory, syntax, and best practices for mastering the attachinterrupt esp8266 function.
Daftar Isi
What Are Interrupts and Why Are They Essential?
- Smartphones in 2025: A Glimpse into the Future of Mobile Technology
- Mastering Real-Time Responses: A Deep Dive into Arduino Mega attachInterrupt
- Mastering Real-Time Events: A Deep Dive into Arduino Uno attachInterrupt
- Mastering Arduino Nano attachInterrupt: A Comprehensive Guide to Responsive Programming
- Arduino Beginner Projects: Your Gateway to Electronics and Programming
In the world of microcontrollers, an interrupt is a signal to the processor that an event of immediate importance has occurred. Think of it like a doorbell. You could be busy cooking, cleaning, or reading a book (your main loop()). Instead of walking to the door every 30 seconds to see if someone is there (polling), you can continue your tasks uninterrupted. When the doorbell rings (the interrupt event), you immediately pause what you’re doing, answer the door (execute the Interrupt Service Routine or ISR), and then resume your original task.
This analogy highlights the key advantages of using interrupts:
- Efficiency: The processor isn’t wasting cycles repeatedly checking a pin’s state. It can perform other computations, update displays, or handle network traffic. This is crucial for power-sensitive applications where minimizing CPU usage is important.
- Responsiveness: The reaction to an external event is nearly instantaneous. With polling, if the event (like a very short button press) happens between your checks, you might miss it entirely. An interrupt guarantees that the event will be caught and handled immediately.
- Code Simplicity: Your main
loop()function becomes much cleaner. Instead of being cluttered withif (digitalRead(pin) == HIGH)statements, it can focus on the program’s primary logic, while the event-driven tasks are neatly encapsulated within their own dedicated functions. Proper use of the attachinterrupt esp8266 function leads to more organized and maintainable code.

The attachInterrupt Syntax for ESP8266
The Arduino Core for the ESP8266 provides the attachInterrupt() function, making the transition seamless for those familiar with the standard arduino attachinterrupt ecosystem. The function signature is as follows:
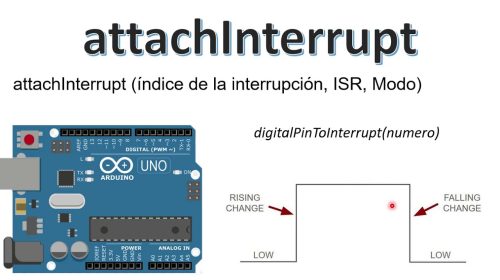
attachInterrupt(digitalPinToInterrupt(pin), ISR, mode);
Let’s break down each parameter in detail.
digitalPinToInterrupt(pin)
This is a crucial macro that translates a GPIO pin number into the specific interrupt number that the processor understands. You should not pass the raw GPIO number directly to the function (e.g.,attachInterrupt(5, ...)). Instead, always wrap it in this macro, likeattachInterrupt(digitalPinToInterrupt(5), ...). On the ESP8266, you can use interrupts on GPIOs 0 through 15. This is a significant advantage over classic Arduino boards like the Uno, which only have two dedicated interrupt pins.ISR(Interrupt Service Routine)
This is the name of the function that will be executed when the interrupt is triggered. This function, known as an Interrupt Service Routine, must be carefully written. There are strict rules for ISRs:- Keep it Short and Fast: An ISR should execute as quickly as possible. While it’s running, all other interrupts are typically paused, which can affect the timing of other parts of your program (like
millis()andmicros()). - No Delays: Do not use
delay()ordelayMicroseconds()inside an ISR. - Limited Serial Communication: Avoid using
Serial.print()or other serial functions inside an ISR, as they are often too slow and can rely on interrupts themselves, potentially causing your program to lock up. - Use
volatileVariables: Any global variable that is modified inside an ISR and also used in the main loop must be declared with thevolatilekeyword. This tells the compiler that the variable’s value can change at any time, preventing it from making optimizations that could lead to your main loop reading a stale value. - Use
IRAM_ATTR: For the ESP8266, it is highly recommended to prefix your ISR function definition withIRAM_ATTR. This attribute instructs the compiler to place the ISR code in the microcontroller’s RAM instead of flash memory. Executing from RAM is significantly faster, which is critical for time-sensitive interrupt routines. Example:void IRAM_ATTR myISR() ...
- Keep it Short and Fast: An ISR should execute as quickly as possible. While it’s running, all other interrupts are typically paused, which can affect the timing of other parts of your program (like
mode
This parameter defines what kind of signal change will trigger the interrupt. There are three primary modes used with the attachinterrupt esp8266 function:RISING: The interrupt is triggered when the pin’s state goes from LOW to HIGH.FALLING: The interrupt is triggered when the pin’s state goes from HIGH to LOW. This is the most common mode for button presses when using a pull-up resistor.CHANGE: The interrupt is triggered on any change of state (from LOW to HIGH or HIGH to LOW).
Practical Example: A Non-Blocking Button Counter
Let’s build a simple project that demonstrates the power of the attachinterrupt esp8266 function. We will count the number of times a button is pressed without using any polling in the main loop().
Hardware Setup:
- An ESP8266 development board (e.g., NodeMCU, Wemos D1 Mini).
- A momentary push-button.
- Connect one leg of the button to GPIO 5 (D1 on NodeMCU).
- Connect the other leg of the button to Ground (GND).
We will use the ESP8266’s internal pull-up resistor, so no external resistor is needed.
// Define the GPIO pin for the button
const int buttonPin = 5; // D1 on NodeMCU

// A volatile variable to store the button press count
// 'volatile' is essential because this variable is modified in an ISR
volatile int buttonPresses = 0;

// This is our Interrupt Service Routine (ISR)
// IRAM_ATTR places the function in RAM for faster execution
void IRAM_ATTR handleInterrupt()
  // This function is called every time the button is pressed (FALLING edge)
  buttonPresses++;


void setup()
  Serial.begin(115200);
  Serial.println("ESP8266 Interrupt Counter Initialized");

  // Configure the button pin as an input with an internal pull-up resistor
  // The pin will be HIGH by default and go LOW when the button is pressed
  pinMode(buttonPin, INPUT_PULLUP);

  // Attach the interrupt to the button pin
  // We use digitalPinToInterrupt() to get the correct interrupt number
  // The ISR 'handleInterrupt' will be called on a FALLING edge
  attachInterrupt(digitalPinToInterrupt(buttonPin), handleInterrupt, FALLING);


void loop()
  // The main loop is now completely free to do other things.
  // For this example, we'll just print the count when it changes.

  static int lastReportedPresses = 0;

  // We temporarily disable interrupts to safely read the multi-byte variable
  noInterrupts();
  int currentPresses = buttonPresses;
  interrupts();

  if (currentPresses != lastReportedPresses)
    Serial.print("Button has been pressed ");
    Serial.print(currentPresses);
    Serial.println(" times.");
    lastReportedPresses = currentPresses;


  // You can add other non-blocking code here.
  // For example, managing a web server, blinking another LED, etc.
In this example, the loop() function is clean and efficient. The critical task of detecting the button press is handled entirely in the background by the hardware interrupt configured via the attachinterrupt esp8266 command.
Advanced Considerations and Best Practices
While the basic implementation is straightforward, real-world applications often require a more nuanced approach.
1. Switch Debouncing
Mechanical switches don’t create a clean electrical signal. When you press or release a button, the metal contacts can "bounce" for a few milliseconds, creating a series of rapid ON-OFF signals. An interrupt will trigger on each of these bounces, resulting in one physical press being counted multiple times.
A common software solution is to use millis() to ignore subsequent triggers that occur too quickly.
volatile unsigned long lastInterruptTime = 0;
const long debounceDelay = 200; // 200 milliseconds

void IRAM_ATTR handleInterrupt()
  unsigned long interruptTime = millis();
  // If the time since the last interrupt is greater than our delay, it's a new press
  if (interruptTime - lastInterruptTime > debounceDelay)
    buttonPresses++;
    lastInterruptTime = interruptTime;
By adding this simple time check inside the ISR, you can effectively filter out the noise from switch bounce, making your attachinterrupt esp8266 implementation more reliable.
2. Atomic Operations and Critical Sections
When a global variable shared between an ISR and the main loop is larger than a single byte (like an int or long), reading or writing it is not an "atomic" operation. This means the processor might take multiple machine instructions to access it. An interrupt could fire in the middle of this multi-step process, leading to data corruption.
To prevent this, you should create a "critical section" in your main loop where you temporarily disable interrupts while accessing the shared variable.
// In the main loop()
int localCopy;

noInterrupts(); // Disable interrupts
localCopy = buttonPresses; // Safely copy the value
interrupts(); // Re-enable interrupts

// Now use 'localCopy' for your logic
if (localCopy > 10)
  // Do something
This ensures that you always get a clean, complete copy of the variable’s value without the risk of it being changed halfway through the read operation. This is a vital practice for robust coding with the attachinterrupt esp8266 system.
3. Detaching an Interrupt
There may be times when you need to temporarily or permanently stop an interrupt from firing. For this, you can use the detachInterrupt() function:
detachInterrupt(digitalPinToInterrupt(pin));
This is useful if you need to reconfigure the pin for a different purpose or change the ISR function associated with it during runtime.
Comparing attachInterrupt on ESP8266 vs. Standard Arduino
While the Arduino framework provides a consistent API, there are important differences between using attachinterrupt esp8266 and the standard arduino attachinterrupt on an AVR-based board like the Arduino Uno.
- Pin Availability: This is the biggest advantage of the ESP8266. The Arduino Uno only supports interrupts on two pins (D2 and D3). The ESP8266, however, supports interrupts on all of its main GPIO pins (0-15), offering far greater flexibility in your hardware design.
- Performance: The ESP8266’s 32-bit processor runs at a much higher clock speed (80 or 160 MHz) compared to the Uno’s 8-bit, 16 MHz processor. This means it can execute ISRs much faster.
IRAM_ATTR: This attribute is specific to the ESP8266 (and ESP32) architecture. It is a necessary optimization for performance-critical ISRs that is not available or needed on AVR-based Arduinos.- Functionality: The core modes (
RISING,FALLING,CHANGE) are consistent across both platforms, which is a testament to the excellent work done by the creators of the Arduino Core for ESP8266.
Conclusion
The attachinterrupt esp8266 function is an indispensable tool for any developer looking to build high-performance, event-driven projects. By offloading the task of monitoring inputs to the microcontroller’s hardware, you can create applications that are both highly responsive and computationally efficient. By understanding the core syntax, adhering to the best practices for writing ISRs—keeping them short, using volatile and IRAM_ATTR, and handling potential issues like switch bounce and data corruption—you can unlock the full potential of your ESP8266. Moving from a polling-based mindset to an interrupt-driven one is a key milestone in becoming a more proficient embedded systems programmer. The robust implementation of attachinterrupt esp8266 makes this powerful feature accessible to hobbyists and professionals alike.