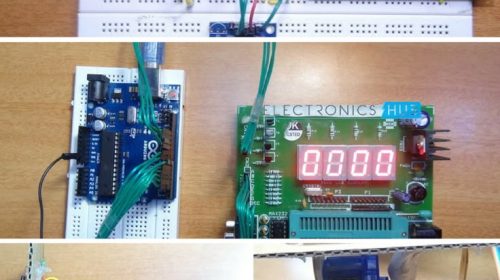
Getting started with Arduino based projects for beginners can be an incredibly rewarding journey into the world of electronics and programming. The Arduino platform, with its user-friendly hardware and software, has opened the doors for hobbyists, students, and creators of all ages to build amazing interactive devices. If you’ve just unboxed your first Arduino board and are wondering where to begin, you’re in the right place. This guide will walk you through the essential concepts and provide a curated list of projects that are perfect for building your skills and confidence, one step at a time.
The beauty of Arduino lies in its simplicity and the vast community surrounding it. It’s an open-source electronics platform based on an easy-to-use microcontroller board and a development environment (the Arduino IDE) for writing and uploading code. You don’t need a degree in electrical engineering to start; all you need is curiosity and a willingness to learn.
- Smartphones in 2025: A Glimpse into the Future of Mobile Technology
- Arduino Beginner Projects: Your Gateway to Electronics and Programming
- How to Program an Arduino: A Comprehensive Guide for Beginners
Daftar Isi
- 1 Before You Begin: Your Arduino Starter Kit
- 2 The Power of Small Arduino Projects for Beginners
- 3 Top 10 Arduino Projects for Beginners to Kickstart Your Journey
- 3.1 1. The Classic: Blinking an LED
- 3.2 2. Fading an LED with PWM
- 3.3 3. Push Button LED Control
- 3.4 4. Potentiometer LED Brightness Control
- 3.5 5. RGB LED Color Mixer
- 3.6 6. Simple Alarm with a Piezo Buzzer
- 3.7 7. Light-Sensitive Night Light
- 3.8 8. Temperature Display on Serial Monitor
- 3.9 9. Controlling a Servo Motor
- 3.10 10. Simple Traffic Light Controller
- 4 Beyond the Basics: What’s Next?
Before You Begin: Your Arduino Starter Kit
To embark on your electronics adventure, you’ll need a few basic components. While you can buy them individually, purchasing an Arduino starter kit is often the most cost-effective and convenient way to get everything you need. A good kit will typically include:
- An Arduino Board: The Arduino Uno is the most common and recommended board for beginners due to its robustness and extensive documentation.
- USB Cable: This is used to connect your Arduino to your computer for both power and uploading code.
- Breadboard: A solderless board that allows you to prototype circuits easily by simply plugging in components and wires.
- Jumper Wires: These are used to connect components on the breadboard to each other and to the Arduino board.
- LEDs: Light Emitting Diodes are essential. You’ll use them in many beginner projects to get visual feedback. A kit should have various colors.
- Resistors: These components are crucial for limiting the current that flows to other parts of your circuit, like LEDs, to prevent them from burning out.
- Push Buttons: These allow you to add user input to your projects.
- Potentiometer: A variable resistor with a knob that allows you to provide a range of analog input, perfect for controlling things like brightness or speed.
- Sensors: Many kits include simple sensors like a photoresistor (to detect light), a temperature sensor, or an ultrasonic sensor (to measure distance).
- Buzzer: For creating simple sounds and alarms.
- Servo Motor: A type of motor that allows for precise control of angular position.

You will also need to download the free Arduino IDE (Integrated Development Environment) from the official Arduino website. This is the software you’ll use to write your code (called "sketches") and upload it to your board.
The Power of Small Arduino Projects for Beginners
When starting out, it’s tempting to jump straight to building a complex robot or a home automation system. However, the key to success is to start small. The journey is built on a foundation of fundamental skills, and these are best learned through simple, manageable tasks. Focusing on small arduino projects for beginners prevents frustration and ensures that you understand the "why" behind every connection and line of code.
Each of these foundational projects teaches a core concept. Blinking an LED teaches digital output. Reading a button teaches digital input. Using a potentiometer introduces analog input. These small arduino projects for beginners are the essential building blocks for more complex inventions. By mastering them, you’re not just completing a tutorial; you’re building a mental toolkit that you can use to design and troubleshoot your own unique creations in the future.
Top 10 Arduino Projects for Beginners to Kickstart Your Journey
The following list contains a variety of small arduino projects for beginners designed to be both fun and educational. They are arranged in a way that allows you to build upon the skills you learned in the previous project.
1. The Classic: Blinking an LED
This is the "Hello, World!" of electronics. It’s the very first project almost everyone does, and it provides instant gratification. It teaches the most basic principle: controlling an output pin.
- Components Needed: Arduino Uno, Breadboard, 1x LED, 1x 220-ohm Resistor, Jumper Wires.
- What You’ll Learn: Basic circuit setup, digital output (
pinMode(),digitalWrite()), and using thedelay()function to control timing.
2. Fading an LED with PWM
Instead of just turning an LED on and off, this project teaches you to make it smoothly fade in and out. This introduces a powerful concept called Pulse Width Modulation (PWM).
- Components Needed: Same as the blinking LED project.
- What You’ll Learn: Analog output using PWM (
analogWrite()), which allows you to control the brightness of an LED or the speed of a motor.
3. Push Button LED Control
Now let’s add some interactivity. This project uses a push button to control the state of an LED. Press the button, the light turns on; release it, the light turns off.
- Components Needed: Arduino Uno, Breadboard, 1x LED, 1x Push Button, 2x Resistors (220-ohm for LED, 10k-ohm for button), Jumper Wires.
- What You’ll Learn: Digital input (
digitalRead()), using a pull-down resistor to ensure a stable input signal, and basicif-elselogic in your code.
4. Potentiometer LED Brightness Control
This project takes the previous concepts a step further by introducing analog input. You’ll use a potentiometer (a knob you can turn) to control the brightness of the fading LED.
- Components Needed: Arduino Uno, Breadboard, 1x LED, 1x 220-ohm Resistor, 1x Potentiometer, Jumper Wires.
- What You’ll Learn: Reading analog values from a sensor (
analogRead()), and mapping those values to a different range (e.g., mapping the 0-1023 analog reading to the 0-255 PWM range for the LED).
5. RGB LED Color Mixer
Why stick to one color? An RGB LED is essentially three LEDs (Red, Green, and Blue) in one package. By controlling the brightness of each one, you can mix them to create almost any color.
- Components Needed: Arduino Uno, Breadboard, 1x Common Cathode RGB LED, 3x 220-ohm Resistors, Jumper Wires. (Using three potentiometers is a fun extension).
- What You’ll Learn: Reinforcing PWM concepts by controlling three channels simultaneously to mix colors.
6. Simple Alarm with a Piezo Buzzer
Time to make some noise! This project shows you how to use a piezo buzzer to create simple tones. You can combine this with a push button to create a basic alarm or doorbell.
- Components Needed: Arduino Uno, Breadboard, 1x Piezo Buzzer, Jumper Wires.
- What You’ll Learn: Creating sound using the
tone()function, which requires specifying a pin, frequency (the pitch), and duration.
7. Light-Sensitive Night Light
This is one of the first truly "smart" simple projects using Arduino. You’ll use a photoresistor (a light-dependent resistor) to detect the ambient light level and automatically turn on an LED when it gets dark.
- Components Needed: Arduino Uno, Breadboard, 1x LED, 1x Photoresistor, 1x 220-ohm Resistor, 1x 10k-ohm Resistor, Jumper Wires.
- What You’ll Learn: Reading data from a simple analog sensor and using conditional logic to make your project react to its environment.
8. Temperature Display on Serial Monitor
Let’s move to a slightly more advanced sensor. This project uses a temperature sensor (like the TMP36) to read the room temperature and display it on your computer using the Arduino IDE’s Serial Monitor.
- Components Needed: Arduino Uno, Breadboard, 1x TMP36 Temperature Sensor, Jumper Wires.
- What You’ll Learn: Using the Serial Monitor for debugging and data display (
Serial.begin(),Serial.println()), and performing calculations in your code to convert raw sensor data into meaningful information (e.g., voltage to Celsius).
9. Controlling a Servo Motor
Projects that move are always exciting. A servo motor is an excellent introduction to robotics and motion control. This project will teach you to make a servo sweep back and forth.
- Components Needed: Arduino Uno, Breadboard, 1x Micro Servo Motor, Jumper Wires.
- What You’ll Learn: How to use the Arduino Servo library, which makes controlling these motors incredibly easy. You’ll learn to attach a servo to a pin and write commands to move it to specific angles.
10. Simple Traffic Light Controller
This project is a great capstone for beginners as it combines several concepts you’ve learned. You will create a simple traffic light sequence using red, yellow, and green LEDs.
- Components Needed: Arduino Uno, Breadboard, 1x Red LED, 1x Yellow LED, 1x Green LED, 3x 220-ohm Resistors, Jumper Wires.
- What You’ll Learn: Managing multiple outputs at once and creating timed sequences with
delay(). This project reinforces your understanding of program flow and logic.
Beyond the Basics: What’s Next?
Once you have completed these projects, you will have a solid understanding of the fundamentals. The real fun begins when you start combining these concepts. What if you used the temperature sensor to control the color of the RGB LED? Or used the light sensor to activate the servo motor?
The journey doesn’t end here. The world of Arduino is vast, with countless shields (add-on boards), sensors, and modules to explore. You can dive into LCD screens, motor drivers, GPS modules, or even connect your projects to the internet. Remember that even the most advanced creators started with small arduino projects for beginners just like these. The key is to stay curious, experiment, and not be afraid to make mistakes. The robust community and wealth of online tutorials are there to support you every step of the way. Happy building